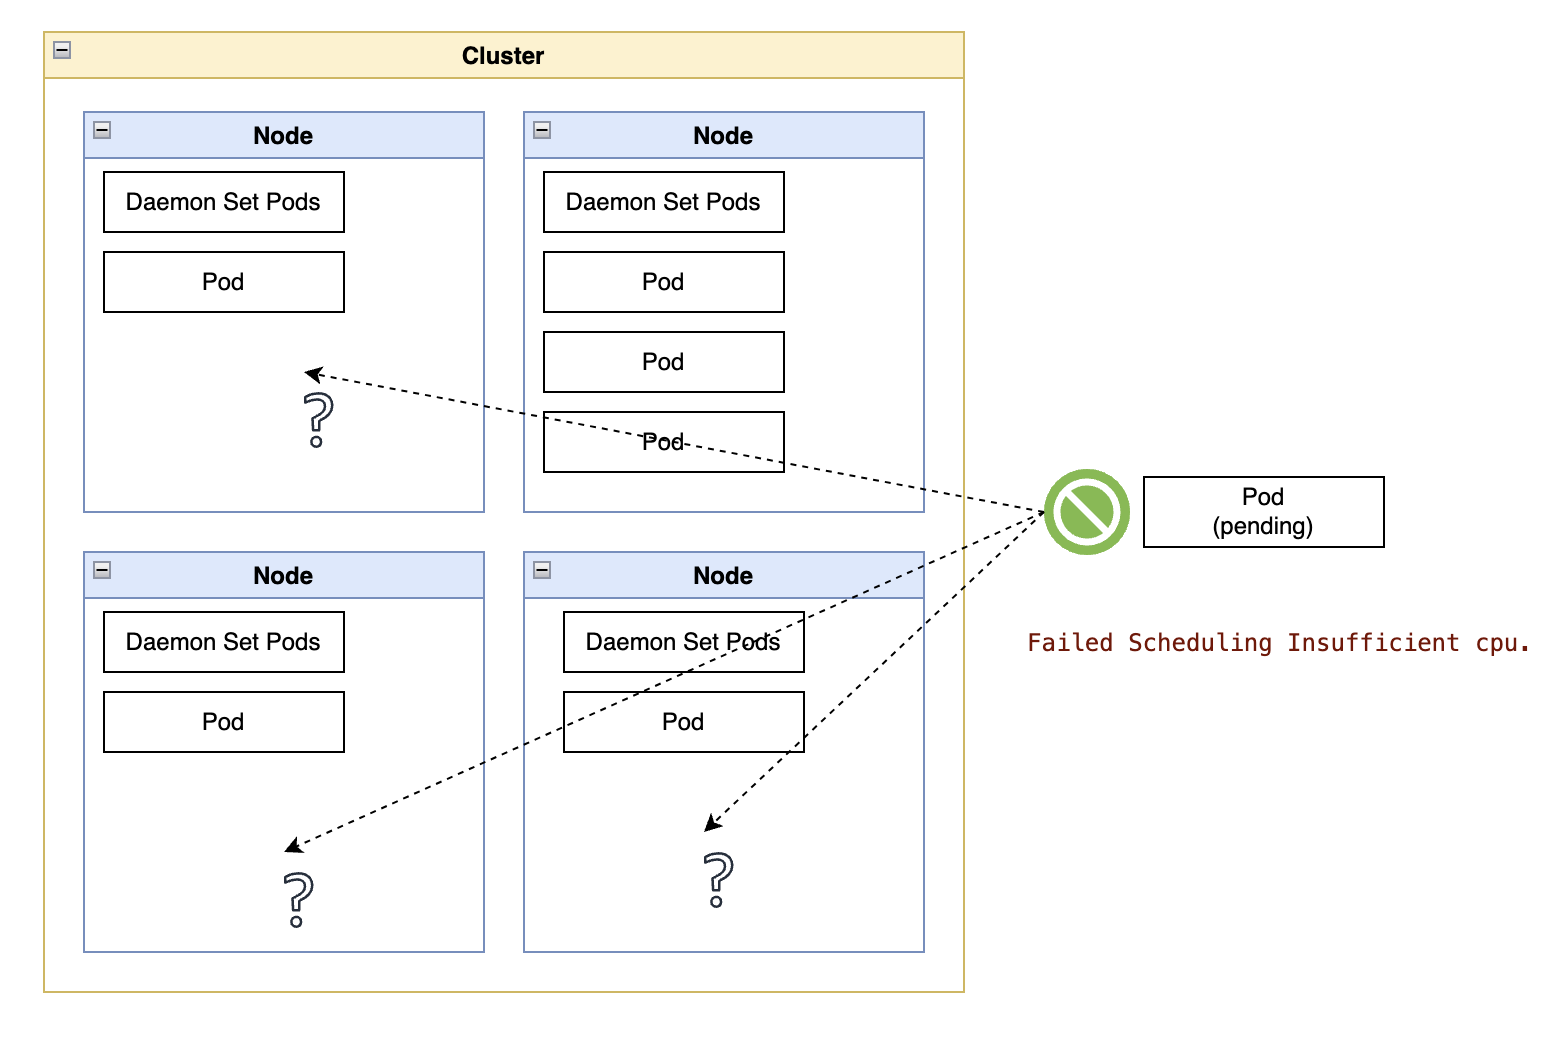
Running Knative services on AWS spot instances
This article is a technical exploration of several technologies to reduce the cost of running workloads in Kubernetes.
The exploration goes into how the characteristics of each of these technologies favor certain types of workloads and ultimately combines all these components into a deployment strategy that utilizes their core strengths.
The general approach works better with containers designed using serverless principles, such as reduced internal state, lightweight footprints, and quick startup times.
Components
This section lists the core components of this article, a brief overview, and pointers for further reading.
 |
|---|
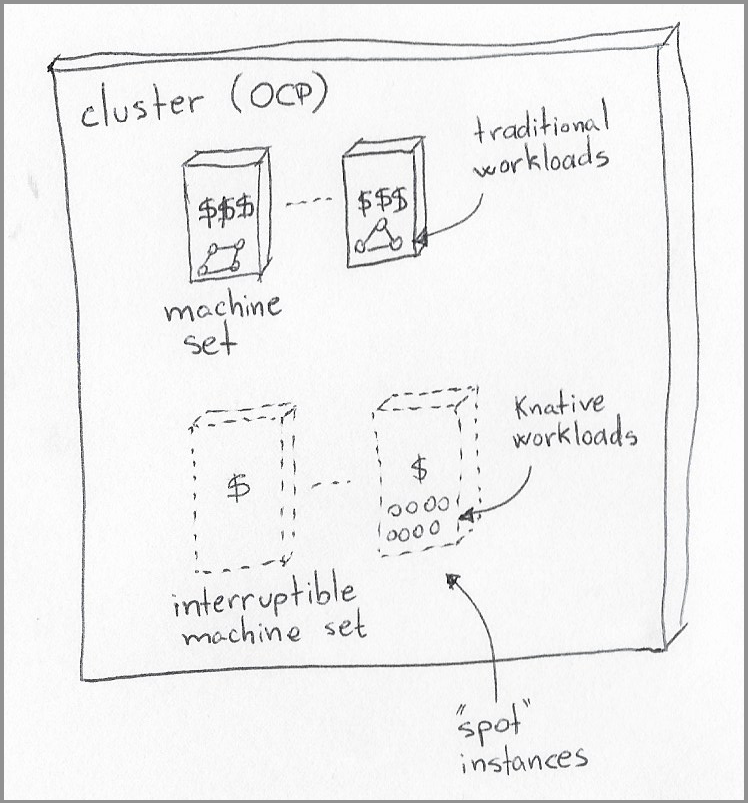
| OpenShift cluster with two types of machine sets for two distinct types of workloads. |
Note: I struggled with the decision to use OpenShift over EKS for this tutorial. On the one hand, using AWS as the cloud provider makes EKS a more natural choice. On the other hand, I have easy access to OpenShift licenses, which makes the article more readily portable to GCP and Azure. If you prefer using an EKS cluster, replace the OpenShift portions with the instructions in this AWS tutorial, where “Spot Managed node groups” are the rough functional equivalent to the concept of OpenShift machine sets.
OpenShift Container Platform
OpenShift Container Platform (OCP) is a Kubernetes distribution from Red Hat.
OCP adds a rich management interface around the Kubernetes runtime, making it easier to install the open-source components used in this article and, most importantly, visualize the resources and browse their metrics. I made a special effort to avoid using OCP-specific commands where possible, making life a little easier for those who wish to attempt this exercise with a different distribution or even “plain” Kubernetes.
AWS and Spot Instances
I chose AWS as the cloud provider in this experiment for a few reasons:
- It supports the concept of “spot instances,” where customers can request instances from a pool of spare capacity in the provider. These instances are relatively cheaper than regular instances, with one catch: the cloud provider can take them back after giving your cluster a short notice (typically 30 to 60 seconds).
- OpenShift has native support for requesting spot instances from AWS.
- It is the most widely used public cloud provider, making this examination relevant to a broader audience.
Note that OpenShift also has native support for allocating nodes on Azure or Google Cloud spot instances, so you should be able to replicate the same setup with minor changes to the OCP MachineSet samples in this article.
Knative
Knative is my favorite auto-scaling component in Kubernetes, not the least because it favors a stateless micro-service pattern that carries cleanly into the various serverless offerings across different cloud providers.
At its core, Knative has the “Serving” component, which processes Knative service definitions. Service definitions map to various Kubernetes services, combining a container image with targets of concurrency and sustained requests per second.
The serving component manages the number of replicas for that container to meet service targets. Depending on the service definition, terminates all containers for that workload when there are no more incoming requests.
Environment configuration
Note: This section requires you to apply many resources mentioned in the article to the cluster. You can apply them from a terminal using a Heredoc constructs (see below) or use the OpenShift Import YAML button.
  # make sure you logged into the cluster
  # from this terminal session

  cat << EOF | kubectl apply -f -
  ...yaml resource copy-pasted from the article
  EOF
Choose the AWS region for the cluster
Assuming you have the flexibility to choose the AWS region, try and choose one with a higher “placement score” of provisioning spot instances.
You can assess that score using the “Spot placement score” page of the AWS console and play with different requirements for the number of instances, CPUs, and memory size.
The inline documentation on the page is pretty self-explanatory about the odds of acquiring spot instances meeting your requirements.
Scores serve as a guideline, and no score guarantees that your Spot request will be fully or partially fulfilled. A score of 10 means that your Spot capacity request is highly likely to succeed in that Region or Availability Zone at the time of the request. A score of 1 means that your Spot capacity request is not likely to succeed.
I experimented with many size combinations, and the placement scores matched my expectation that smaller instances (e.g., 4x16) would have higher scores than larger instances (e.g., 16x64.)
My empirical results also showed that the placement score was a good indicator of how soon the cloud provider would reclaim the spot instance. Requesting spot instances of size 16x64 was essentially unusable for a Kubernetes cluster, with the cluster spending more time bringing an instance online than actually being able to load pods in the instance. The results may vary with region and time of day, but statistically speaking, working with smaller spot instances tends to yield much better results.
Create an OCP 4.11 cluster
Note: I mentioned earlier that it is possible to replace OCP with an AWS EKS cluster - using “Spot Managed node groups” instead of OCP machine sets. If there is enough interest, I can try and replicate the entire exercise with EKS.
These instructions were tested with OCP 4.11.7 but should work on OCP 4.6 and above.
I recommend that you use at least three availability zones in the target region (e.g., pick us-east-1a, us-east-1b, and us-east-1c availability zones if installing the cluster in the us-east-1 region.) The multiple availability zones help later in the setup when it is time to create the new worker pool using spot instances.
You can install OCP on AWS using different variations of the IPI procedure (Installer Provisioned Infrastructure,) where the installer requests all infrastructure components from the cloud provider and loads the Kubernetes software on the resulting computing instances.
The OCP’s installation documentation covers the entire procedure, so instead of repeating those instructions, I will add a few comments about the variations:
-
Use Red Hat’s cloud console. This method also offers a user interface around the IPI-based installation, creating a cluster that is functionally equivalent to the other methods.
-
Using Red Hat Advanced Cluster Management for Kubernetes. Assuming you have access to this product, it offers a user interface around the IPI-based installation process, which you can use to create the cluster with a few clicks without getting distracted collecting keys and certificates for the installation process.
Create the OCP MachineSet using spot instances
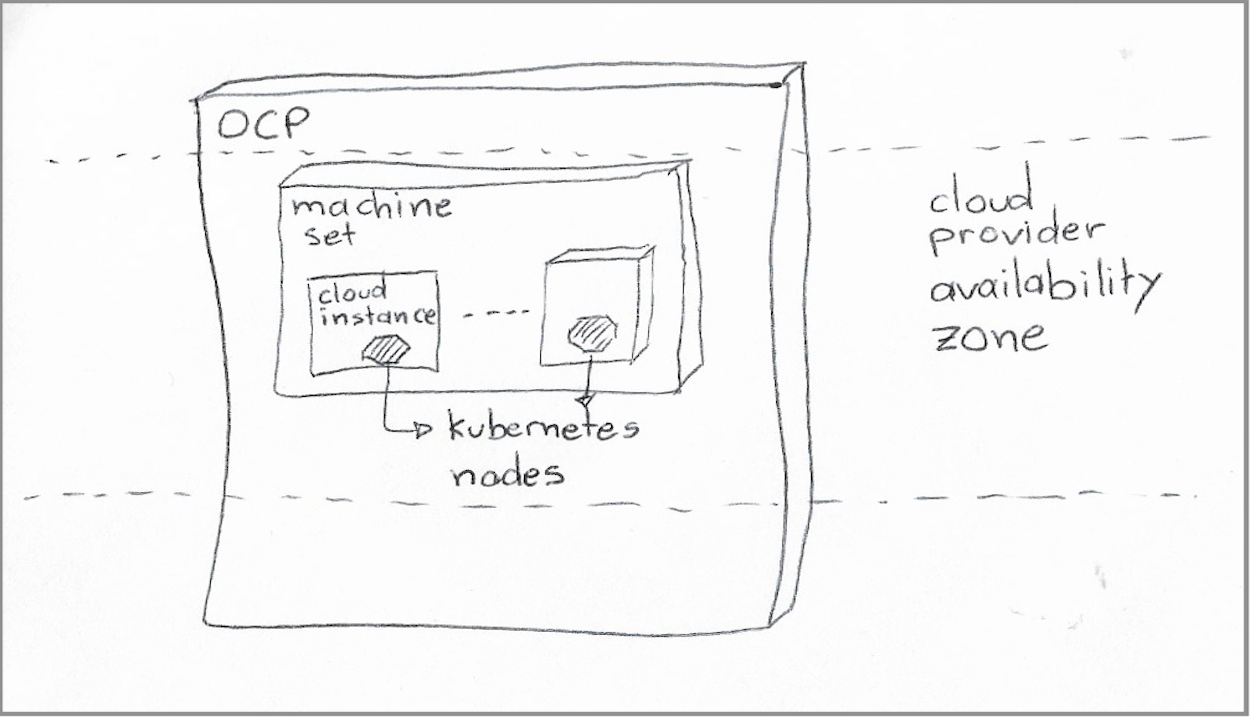
OCP machine sets abstract the underlying cloud provider compute instances for the cluster nodes.
A machine set contains the cloud provider-specific information required to provision new compute instances, such as the region, availability zone, number of CPUs, amount of memory, disk capacity, subnets, and a few others.
 |
|---|
| OCP machine sets, availability zones, and Kubernetes nodes. |
OCP requests that “machine” to the cloud provider, and once the resulting cloud instance is ready, OCP loads it with all the software required to run a Kubernetes node and makes it a part of the cluster.
For illustrative purposes, the following listing is the example of a MachineSet resource immediately after requesting the creation of an OCP cluster. I stripped out a few Kubernetes elements to make it a little more readable, but you can see the entire resource here.
apiVersion: machine.openshift.io/v1beta1
kind: MachineSet
metadata:
  name: cluster-name-worker-us-east-1a
  namespace: openshift-machine-api
spec:
  replicas: 1
  template:
    metadata:
      labels:
        ...
    spec:
      metadata: {}
      providerSpec:
        value:
          apiVersion: machine.openshift.io/v1beta1
          kind: AWSMachineProviderConfig
          instanceType: m5.xlarge
          blockDevices:
            - ebs:
          placement:
            availabilityZone: us-east-1a
            region: us-east-1
          securityGroups:
            ...
          subnet:
            ...
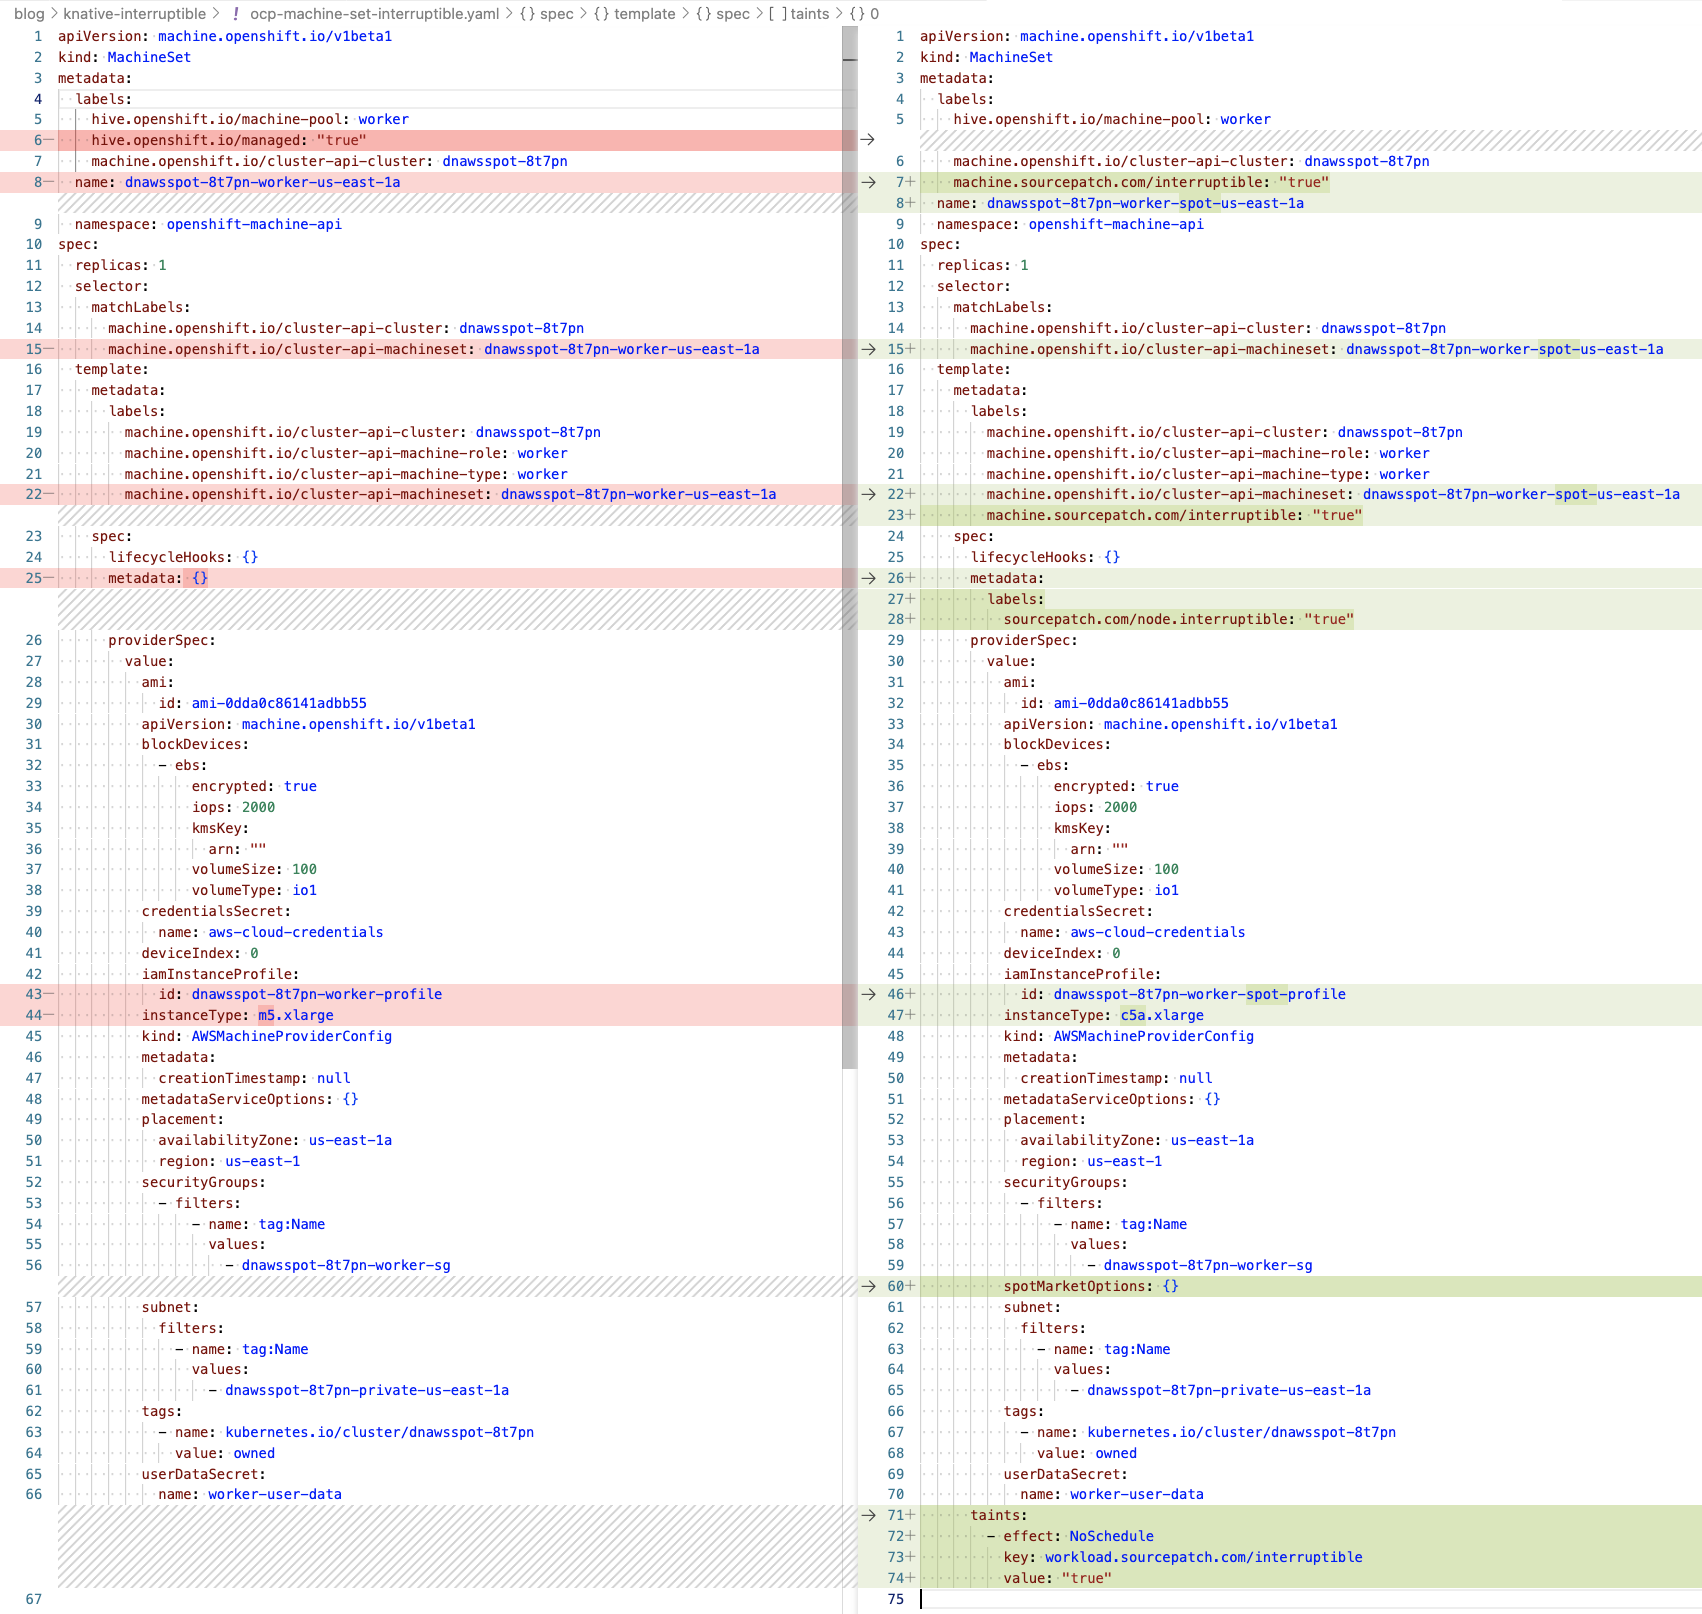
Creating a new machine set requires applying a custom resource to the cluster, like the one in the previous section. Ultimately, the machine set for using AWS spot instances is not that different from a regular machine set, although it requires a few essential modifications:
- Adding a
spotMarketOptionselement to the node template. A node template is an element in the machine set that tells OCP about the extra configuration of the cluster node associated with each instance. ThespotMarketOptionselement informs OCP that it should request AWS for spot instances instead of on-demand instances. A related feature not explored in the article is the ability to include amaxPriceinside thespotMarketOptionselement, indicating the maximum hourly rate you are willing to pay for the instance, which can be pretty helpful in specific scenarios. - Adding a taint to the node template so that only workloads with toleration for that taint will run in the node. This setting prevents essential pods or pods that cannot tolerate frequent interruptions from landing in the nodes created on EC2 spot instances.
- Adding a label to the nodes indicating that they run on interruptible instances. Later we can tell Knative to provision service pods with an affinity for those nodes.
- (optional) Add a label indicating the purpose of these machines (and respective cluster nodes.) This label is helpful when it is time to delete the machine set.
The definition of specific fields can be quite involved, such as secrets and subnets, so I tend to copy and then modify one of the existing machine sets in the cluster. I wrote an example using shell script and the yq utility to create the machine sets to request spot instances.
#!/bin/sh

infra_id=$(kubectl get Infrastructure cluster -o jsonpath='{.status.infrastructureName}')
echo "Infrastructure id is: ${infra_id}"

# Make sure to pick a valid instance type for the cloud region
instance_size=${1:-c5a.xlarge}

kubectl get MachineSet \
        -n openshift-machine-api \
        --selector hive.openshift.io/machine-pool=worker \
        --selector hive.openshift.io/managed=true \
        -o yaml \
    | yq 'del (.items[].status)' \
    | yq 'del (.items[].metadata.annotations)' \
    | yq 'del (.items[].metadata.uid)' \
    | yq 'del (.items[].metadata.resourceVersion)' \
    | yq 'del (.items[].metadata.generation)' \
    | yq 'del (.items[].metadata.creationTimestamp)' \
    | yq 'del (.items[].metadata.labels."hive.openshift.io/managed")' \
    | yq 'del (.items[].metadata.labels."hive.openshift.io/machine-pool")' \
    | yq '.items[].metadata.labels += { "machine.sourcepatch.com/interruptible": "true" }' \
    | yq '.items[].spec.template.metadata.labels += { "machine.sourcepatch.com/interruptible": "true" }' \
    | yq '.items[].spec.template.spec.providerSpec.value.spotMarketOptions={}' \
    | yq '.items[].spec.template.spec.taints += [{ "effect": "NoSchedule", "key": "workload.sourcepatch.com/interruptible", "value": "true" }]' \
    | yq '.items[].spec.template.spec.metadata.labels += { "sourcepatch.com/node.interruptible": "true"}' \
    | yq ".items[].spec.template.spec.providerSpec.value.instanceType= \"${instance_size:?}\"" \
    | sed "s/name: ${infra_id:?}-worker/name: ${infra_id:?}-worker-spot/" \
    | sed "s/machineset: ${infra_id:?}-worker/machineset: ${infra_id:?}-worker-spot/" \
    | kubectl apply -f -
You can see a graphical visualization of the differences between an original machine set and an interruptible machine set in the illustration below.
Immediately after creating the new machine sets, you may notice that they may not report as ready or available. You can use the following command to list their status, noticing how it selects the results using the label added in the .spec.template.metadata.labels section of the modified machine set.
kubectl get machineset \
    -n openshift-machine-api \
    --selector machine.sourcepatch.com/interruptible="true"
The command should produce an output like this:
NAME                         DESIRED   CURRENT   READY   AVAILABLE   AGE
...-worker-spot-us-east-1a   1         1                             6s
...-worker-spot-us-east-1b   1         1                             6s
...-worker-spot-us-east-1c   1         1                             6s
...-worker-spot-us-east-1d   1         1                             6s
After a couple of minutes, assuming the cloud provider fulfilled the spot instance requests, you should see the machines (OCP’s representation of the cloud provider instances) already running with the requested instance type.
Repeat the previous command until it produces an output like this:
NAME                         DESIRED   CURRENT   READY   AVAILABLE   AGE
...-worker-spot-us-east-1a   1         1         1       1           5m1s
...-worker-spot-us-east-1b   1         1         1       1           5m1s
...-worker-spot-us-east-1c   1         1         1       1           5m1s
...-worker-spot-us-east-1d   1         1         1       1           5m1s
After another couple of minutes, with all required software loaded into the instances, you should also see the Kubernetes nodes added to the cluster. You can verify the state of the new nodes with the command below, noticing how it targets the nodes using the node label declared in the .spec.template.spec.metadata.labels section of the modified machine set.
kubectl get node \
    --selector sourcepatch.com/node.interruptible="true"
The command should produce an output similar to this:
NAME                           STATUS   ROLES    AGE     VERSION
ip-10-0-nnn-200.ec2.internal   Ready    worker   6m42s   v1.24.0+...
ip-10-0-nnn-201.ec2.internal   Ready    worker   7m11s   v1.24.0+...
ip-10-0-nnn-202.ec2.internal   Ready    worker   6m31s   v1.24.0+...
ip-10-0-nnn-203.ec2.internal   Ready    worker   6m24s   v1.24.0+...
You should also be able to see the EC2 spot instances allocated in the respective AWS panel. Those instance requests have a status of “fulfilled.”
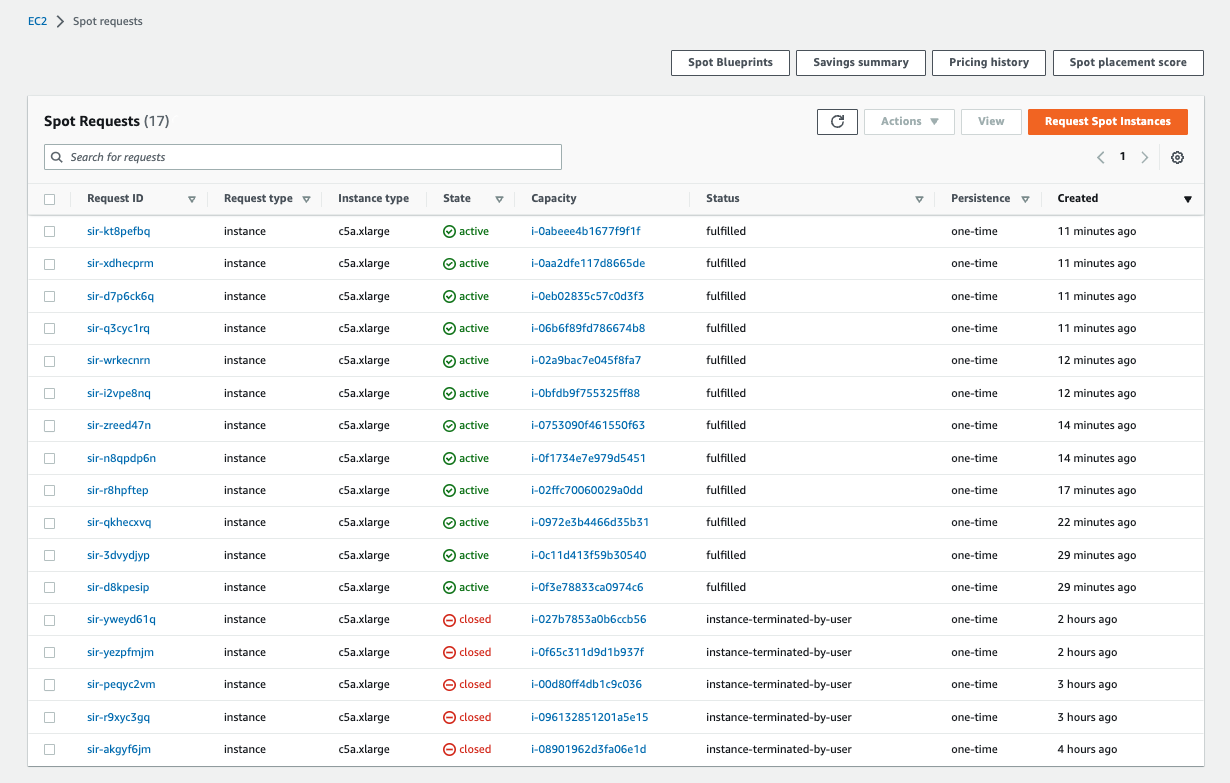 |
|---|
| AWS Spot requests panel |
Create cluster and machine autoscalers
As an optional feature, OCP machine sets can have a variable range of machines instead of a fixed number of replicas. OCP uses pod scheduling information in the cluster to decide the optimal number of instances in a machine set.
The first step to leverage that feature is to enable the OCP cluster autoscaler feature, applying the following resource to the cluster (you can also find this resource in the GitHub repository for this article.)
Important: The settings in this ClusterAutoscaler resource are adequate for the relatively small examples in the article. Make sure you read the OCP documentation for detailed information and important considerations for each setting.
---
apiVersion: autoscaling.openshift.io/v1
kind: ClusterAutoscaler
metadata:
  name: default
spec:
  podPriorityThreshold: -10
  resourceLimits:
    maxNodesTotal: 24
    cores:
      min: 8
      max: 128
    memory:
      min: 4
      max: 256
  scaleDown:
    enabled: true
    delayAfterAdd: 10m
    delayAfterDelete: 5m
    delayAfterFailure: 30s
    unneededTime: 5m
    utilizationThreshold: "0.4"
The second step is to create OCP machine autoscalers for the machine sets created in the previous sections. You need one machine autoscaler per machine set, which tells OCP to adjust the number of replicas in the respective machine set to match the capacity requirements of the cluster.
You can create the resources using a code block like the one below, which iterates through the names of the machine sets created in the previous section. It establishes the respective autoscaler for the machine set, with a range of 0 to 3 machines:
kubectl get MachineSet \
    -n openshift-machine-api \
    --selector machine.sourcepatch.com/interruptible="true" \
    -o template='{{range .items}}{{.metadata.name}}{{"\n"}}{{end}}' \
| while read -r ms
do
  cat << EOF | kubectl apply -f -
---
apiVersion: autoscaling.openshift.io/v1beta1
kind: MachineAutoscaler
metadata:
  labels:
    machine.sourcepatch.com/interruptible: "true"
  name: ${ms}
  namespace: openshift-machine-api
spec:
  minReplicas: 0
  maxReplicas: 3
  scaleTargetRef:
    apiVersion: machine.openshift.io/v1beta1
    kind: MachineSet
    name: ${ms}
EOF
done
Since the minimum number of replicas was set to zero, and given the taint in the interruptible machine sets preventing other workloads from running in those nodes, the cluster should eventually delete all machines associated with the new machine sets until there are pods scheduled to run on those nodes.
You can observe the node deletion progress by listing the machine resources labeled with the label assigned to their respective machine set in the previous sections.
kubectl get Machine \
    -n openshift-machine-api \
    --selector machine.sourcepatch.com/interruptible="true"
If you timed it right, you should see an output like the one below, where you can still see the cluster deleting the unused nodes.
NAME                            PHASE     TYPE       REGION    ZONE       AGE
...-worker-spot-us-east-1b-...  Deleting  c5a.xlarge us-east-1 us-east-1b 13m
...-worker-spot-us-east-1c-...  Running   c5a.xlarge us-east-1 us-east-1c 13m
...-worker-spot-us-east-1d-...  Running   c5a.xlarge us-east-1 us-east-1d 13m
Install Knative on the cluster
Installing Knative in OCP is simplified through the concept of Kubernetes operators. OCP calls it the Openshift Serverless operator, which is essentially a downstream version of the Knative open-source project.
You can install the OpenShift Serverless operator directly from the OCP console by navigating to the OperatorHub tab, selecting “OpenShift Serverless” and clicking “Install.”
You can also install the operator from a terminal, applying the respective operator group and subscription resources, like the one listed below for convenience:
---
apiVersion: v1
kind: Namespace
metadata:
  name: openshift-serverless
---
apiVersion: operators.coreos.com/v1
kind: OperatorGroup
metadata:
  name: openshift-serverless-group
  namespace: openshift-serverless
spec:
  upgradeStrategy: Default
---
apiVersion: operators.coreos.com/v1alpha1
kind: Subscription
metadata:
  name: serverless-operator
  namespace: openshift-serverless
spec:
  channel: stable
  installPlanApproval: Automatic
  name: serverless-operator
  source: redhat-operators
  sourceNamespace: openshift-marketplace
The next step is to install the Knative serving instance, which is responsible for the scheduling of containers to meet the targets of Knative service definitions.
You can see this resource in source format, which is listed for reading convenience here:
---
apiVersion: operator.knative.dev/v1alpha1
kind: KnativeServing
metadata:
  name: knative-serving
  namespace: knative-serving
spec:
  cluster-local-gateway: {}
  controller-custom-certs:
    name: ''
    type: ''
  knative-ingress-gateway: {}
  registry: {}
Enable Knative feature flags
As of now, and by default, Knative does not enable pod affinity and taint tolerations for Knative service definitions. If you attempt to create Knative service definitions before enabling those features, you will receive error messages like this:
Error from server (BadRequest): error when creating “STDIN”: admission webhook “validation.webhook.serving.knative.dev” denied the request: validation failed: must not set the field(s): spec.template.spec.nodeSelector, spec.template.spec.tolerations
and
Error from server (BadRequest): error when creating “STDIN”: admission webhook “validation.webhook.serving.knative.dev” denied the request: validation failed: must not set the field(s): spec.template.spec.tolerations
Before you can use those Knative features, you must enable the corresponding feature flags :
-
Pod spec affinity: https://knative.dev/docs/serving/configuration/feature-flags/#kubernetes-node-affinity
-
Enable taint toleration: https://knative.dev/docs/serving/configuration/feature-flags/#kubernetes-toleration
You can modify the Knative configuration object directly from the OpenShift console or run these two commands from a terminal:
kubectl patch ConfigMap config-features \
    -n knative-serving \
    -p '{"data":{"kubernetes.podspec-affinity":"enabled"}}'

kubectl patch ConfigMap config-features \
    -n knative-serving \
    -p '{"data":{"kubernetes.podspec-tolerations":"enabled"}}'
The examples in this article do not use node selector feature. Still, you can enable it if you want to experiment with different strategies for matching Knative workloads to specific nodes:
kubectl patch ConfigMap config-features \
    -n knative-serving \
    -p '{"data":{"kubernetes.podspec-nodeselector":"disabled"}}'
And now we can start creating Knative service definitions.
Service requests with spot instances
This section shows all components working together. The first step is to create the Knative service definition, which gives us a target service endpoint, then use a utility to exercise that endpoint.
- Create service definitions
- The service sample
- Validating the service readiness
- Validating the installation
- Driving heavy loads
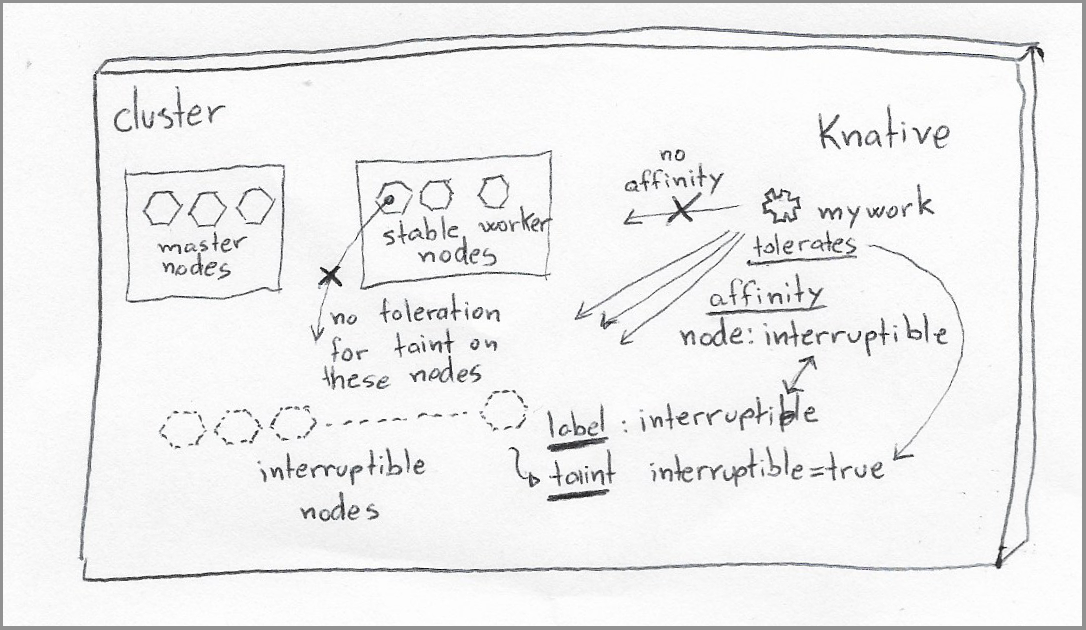 |
|---|
| Setup with all components installed and interacting with one another. |
Create service definitions
A Knative service definition is analogous to pairing a Kubernetes workload definition with a Kubernetes service. You can read the entire service specification for details, which I summarize as follows:
- Container settings, such as image source, resource requests, limits, probe definitions
- Service settings include the service’s endpoint URL, target concurrency, and throughput metrics.
- Routing settings, such as how much traffic goes to each service revision.
The Knative serving module listens to incoming requests on an endpoint and continuously decides the ideal number of containers to meet the service targets - concurrency and requests per second.
The service sample
The basis for this section is a heavily modified version of this Knative code sample: https://knative.dev/docs/serving/autoscaling/autoscale-go/.
Create a Knative service instance with an affinity for the nodes created from the machine set in the previous sections (identified with the “node.interruptible” label) and toleration for the interruptible taint (identified with the node.interruptible taint:)
---
apiVersion: v1
kind: Namespace
metadata:
  name: knative-interruptible
---
apiVersion: serving.knative.dev/v1
kind: Service
metadata:
  name: mywork
  namespace: knative-interruptible
spec:
  template:
    metadata:
      annotations:
        autoscaling.knative.dev/target-utilization-percentage: "70"
        autoscaling.knative.dev/target: "10"
    spec:
      containerConcurrency: 15
      containers:
        - image: "gcr.io/knative-samples/autoscale-go:0.1"
          name: user-container
          resources:
            requests:
              memory: "256Mi"
              cpu: "200m"
            limits:
              memory: "256Mi"
              cpu: "200m"
      enableServiceLinks: false

      # Schedule pods in nodes labeled
      # "sourcepatch.com/node.interruptible"
      # and tolerate their respective taints.
      affinity:
        nodeAffinity:
          requiredDuringSchedulingIgnoredDuringExecution:
            nodeSelectorTerms:
              - matchExpressions:
                  - key:  sourcepatch.com/node.interruptible
                    operator: Exists
                    values: []
      tolerations:
        - key: "workload.sourcepatch.com/interruptible"
          operator: "Exists"
          effect: "NoSchedule"
Validating the service readiness
Before we start sending the request, let’s first validate that the service is ready:
-
Ask for the service details:
kn service describe mywork -n knative-interruptible
At this point, all interruptible nodes may have been deallocated due to inactivity. In that case, you would see the message “Error: Unschedulable` for the service revision.
Name:       mywork
Namespace:  knative-interruptible
Age:        12s
URL:        https://mywork-knative-interruptible.apps.mycluster.domain.io

Revisions:
      !  mywork-00001 (latest created) [1] (12s)
        Error:  Unschedulable
        Image:  gcr.io/knative-samples/autoscale-go:0.1 (at e5e89c)

Conditions:
  OK TYPE                   AGE REASON
  !! Ready                  12s RevisionMissing
  !! ConfigurationsReady    12s RevisionFailed
  !! RoutesReady            12s RevisionMissing
You can confirm that the problem is only temporary due to the machine autoscaler being in the process of allocating a new node by inspecting the service’s underlying pods.
kubectl get pods \
    -n knative-interruptible \
    --selector serving.knative.dev/service=mywork -o yaml
If you waited too long to run the previous command, you might get an empty list result, which is potentially a good sign, indicating that Knative was able to create the pod, validate that the service is configured correctly, and terminate the pod.
In that case, your service is configured correctly, and you can skip the following paragraphs about troubleshooting potential (or transitory) scheduling problems.
In case the pods are still pending, they should contain output resembling something like the output below:
`
{
…
“conditions”: [
{
“lastProbeTime”: null,
“lastTransitionTime”: “2022-10-17T20:02:38Z”,
“message”: “0/7 nodes are available: 3 node(s) had untolerated taint {node-role.kubernetes.io/master: }, 7 node(s) didn’t match Pod’s node affinity/selector. preemption: 0/7 nodes are available: 7 Preemption is not helpful for scheduling.”,
“reason”: “Unschedulable”,
“status”: “False”,
“type”: “PodScheduled”
}
],
“phase”: “Pending”,
“qosClass”: “Burstable”
}
`
You can further confirm that problem is transitory by listing the available machines in the machine set created in this article:
kubectl get Machine \
    -n openshift-machine-api \
    --selector machine.sourcepatch.com/interruptible
The command could produce an output like this, indicating that a machine is being provisioned:
NAME                 PHASE          TYPE         REGION      ZONE         AGE
...-worker-spot...   Provisioning   c5a.xlarge   us-east-1   us-east-1b   24s
Under these circumstances, the new interruptible node should be ready in a couple more minutes, in which case the Knative service should report being ready.
You can validate that the service is ready by running the following command:
kn service describe mywork -n knative-interruptible
The output should look something like this:
Name:       mywork
Namespace:  knative-interruptible
Age:        3m
URL:        https://mywork-knative-interruptible.apps.mycluster.domain.io

Revisions:
  100%  @latest (mywork-00001) [1] (3m)
        Image:     gcr.io/knative-samples/autoscale-go:0.1 (at e5e89c)
        Replicas:  1/1

Conditions:
  OK TYPE                   AGE REASON
  ++ Ready                  40s
  ++ ConfigurationsReady    41s
  ++ RoutesReady            40s
Validating the installation
There are many alternatives for validating the installation, such as the ones in the following list:
- A simple
curlrequest to the service endpoint - If you plan to take this exploration into production, I strongly encourage you to look into something like the K6 framework, then setup K6 locally and in the cluster to gather detailed metrics for continued analysis during development and post-deployment.
-
Use the
heyload generator (go install github.com/rakyll/hey@latest) referenced in the Knative documentation.Note: You will need to install the Golang SDK before installing the
heyutility since the project does not release binaries for all platforms. The utility, by default, will be downloaded to$HOME/go/bin, and you can move it to a system folder in ourPATHenvironment variable such as/usr/binor/usr/local/bin
Important: When running a performance load utility such as K6 and hey, be particularly mindful of where you will run the utility, considering the network bandwidth and data transfer costs between the client and the cluster. I strongly suggest you run these utilities from a location as close as possible to the cluster, such as another compute instance in the same private subnet where the cluster nodes are running.
For this article, I am using the hey utility, which provides a good balance of ease of use with the ability to generate controlled bursts of requests toward a service endpoint.
Let’s start with a run of 5 sustained requests over 30 seconds:
url=$(kn service describe mywork -n knative-interruptible -o url)

hey -z 10s -c 5 -t 240 "${url:?}?sleep=100&prime=10000&bloat=5" \
    && kubectl get pods -n knative-interruptible
Note the -t 240 parameter, which instructs the utility to wait longer for responses from the service, accounting for the possibility that all autoscaled machine sets created in this article may have scaled down to zero before you got to this step.
This light load does not require many pods but is a good warm-up exercise, and successful responses validate that all components are working correctly.
While the utility is still querying the service, run the following command from a different terminal to determine the service status:
kn service describe mywork -n knative-interruptible
Notice that at first, due to the machine set autoscaling configured in previous sections, the machine set for these pods may not have any machine allocated to them, which may lead to an output like this:
Name:       mywork
Namespace:  knative-interruptible
Age:        16m
URL:        https://mywork-knative-interruptible.apps.mycluster.domain.io

Revisions:
  100!  @latest (mywork-00001) [1] (16m)
        Error:     Unschedulable
        Image:     gcr.io/knative-samples/autoscale-go:0.1 (at e5e89c)
        Replicas:  0/7

Conditions:
  OK TYPE                   AGE REASON
  !! Ready                  13s RevisionFailed
  !! ConfigurationsReady    13s RevisionFailed
  ++ RoutesReady            13m
Notice how the field Replicas lists 0/7, indicating that Knative assessed the need for seven replicas to handle the incoming requests and that zero of those pods could be allocated until a new node comes online.
If you wait a few more minutes, repeating the previous command should produce an output like this:
Name:       mywork
Namespace:  knative-interruptible
Age:        3h
URL:        https://mywork-knative-interruptible.apps.mycluster.domain.io

Revisions:
  100%  @latest (mywork-00001) [1] (24m)
        Image:     gcr.io/knative-samples/autoscale-go:0.1 (at e5e89c)
        Replicas:  7/7

Conditions:
  OK TYPE                   AGE REASON
  ++ Ready                  24m
  ++ ConfigurationsReady    24m
  ++ RoutesReady            24m
We can see that the service is reporting being ready and has determined that it allocated all seven container replicas to meet the service requirements.
Driving heavy loads
With the installation validated, it is time to generate a higher load to exercise the total capacity of the pool of interruptible nodes.
Let’s request sustained 250 requests per second for 300 seconds. Note the usage of 300-second timeout (using the -t 300 parameter) to account for the time it may take for any eventual scaling up of a machine set.
url=$(kn service describe mywork -n knative-interruptible -o url)

hey -z 300s -c 250 -t 300 "${url:?}?sleep=100&prime=1000&bloat=1" \
    && kubectl get pods -n knative-interruptible
You should be able to see the various signs of activity in the cluster using different methods, such as:
- Running the
kn service describe mywork -n knative-interruptiblecommand to determine the current allocation of service replicas versus the target number of replicas. - Observing the corresponding
Deploymentresource in the OCP “Workloads -> Deployments” tab and switching to theknative-interruptionproject at the top. - Listing the corresponding pods associated with the service with
kubectl get pods -n knative-interruptible.
Once the hey utility returns, you should see an output like the one below with likely different numerical results:
Tue Oct 18 20:16:31 UTC 2022

Summary:
  Total:        300.1402 secs
  Slowest:      1.2196 secs
  Fastest:      0.0031 secs
  Average:      0.1113 secs
  Requests/sec: 2246.3932

  Total data:    66059521 bytes
  Size/request:    97 bytes

Response time histogram:
  0.003 [1]     |
  0.125 [621740]|■■■■■■■■■■■■■■■■■■■■■■■■■■■■■■■■■■■■■■■■
  0.246 [50065] |■■■
  0.368 [1104]  |
  0.490 [428]   |
  0.611 [306]   |
  0.733 [201]   |
  0.855 [101]   |
  0.976 [100]   |
  1.098 [114]   |
  1.220 [73]    |


Latency distribution:
  10% in 0.1034 secs
  25% in 0.1039 secs
  50% in 0.1045 secs
  75% in 0.1055 secs
  90% in 0.1128 secs
  95% in 0.1667 secs
  99% in 0.1957 secs

Details (average, fastest, slowest):
  DNS+dialup:    0.0000 secs, 0.0031 secs, 1.2196 secs
  DNS-lookup:    0.0000 secs, 0.0000 secs, 0.0200 secs
  req write:    0.0000 secs, 0.0000 secs, 0.0101 secs
  resp wait:    0.1112 secs, 0.0031 secs, 1.2196 secs
  resp read:    0.0000 secs, 0.0000 secs, 0.0010 secs

Status code distribution:
  [200]    674224 responses
  [502]    9 responses
Tuning
Notice how the client in the previous example reported a few HTTP responses of “502”, which means those requests effectively failed. After troubleshooting the problem, I noticed that some pods were exceeding their memory reservation, already set at a rather lofty - for a serverless container - 256Mi of RAM.
This small error rate is not a problem for an exploratory workload like this, especially when using a container image designed to stress the service boundaries through its prime and bloat query parameters. You can try different combinations that increase or improve the failure rates, knowing that higher values for these parameters will require higher container resource requests and possibly result in higher rates of HTTP error responses.
When working with real workloads meant for a production environment, this type of setup with dynamic capacity allocation requires a firm grip on the performance characteristics of your container, chiefly among them:
- Maximum number of concurrent requests per instance
- Container memory utilization while serving that maximum number of requests
- Container CPU utilization while serving that maximum number of requests
- Time to readiness, counting the time between the pod being assigned to a node and all readiness probes returning their first successful reply.
In general, you want to optimize these parameters for the best balance between quick response times and resource utilization and then reflect these parameters in the Knative service definition.
Conclusion
This article shows the cluster auto-scaling and Knative services team up to run over interruptible cloud instances and generate significant cost savings for workloads with more relaxed service-level objectives.
These savings are multiplied over the life of the service, with the cluster autoscaling reducing fixed capacity allocation and the interruptible cloud instances reducing the hourly cost of that remaining capacity.
For the variable cost portion, the hourly savings depend on the spot price of the instance at the time of the request. In the case of AWS, you can see a “savings” summary at any point to give you an idea of how much you saved over the allocation of on-demand instances.
For the fixed allocation part, Knative pairs well with the cluster autoscaler, with the scheduling of services using scale-to-zero settings. In those scenarios, the reduced activity on an endpoint eventually translates to the deallocation of nodes reserved for that service (using the affinity and tainting techniques explained in this article,) producing significant cost savings over fixed allocation strategies for pods and nodes.
References
-
OpenShift - Machine sets that deploy machines as Spot Instances
-
OpenShift - How to add new nodes in OpenShift 4.x with taints using machineset configuration?
-
OpenShift - Applying autoscaling to an OpenShift Container Platform cluster
-
OpenShift - Setting node label with machineset during node creation
-
OpenShift - Machine sets that deploy machines as Spot Instances
-
AWS - Amazon EKS adds support for EC2 Spot Instances in managed node groups


