The Curious Case of the Pending Pod
Overview
This technote started with a seemingly mysterious case of a Kubernetes pod in a pending state.
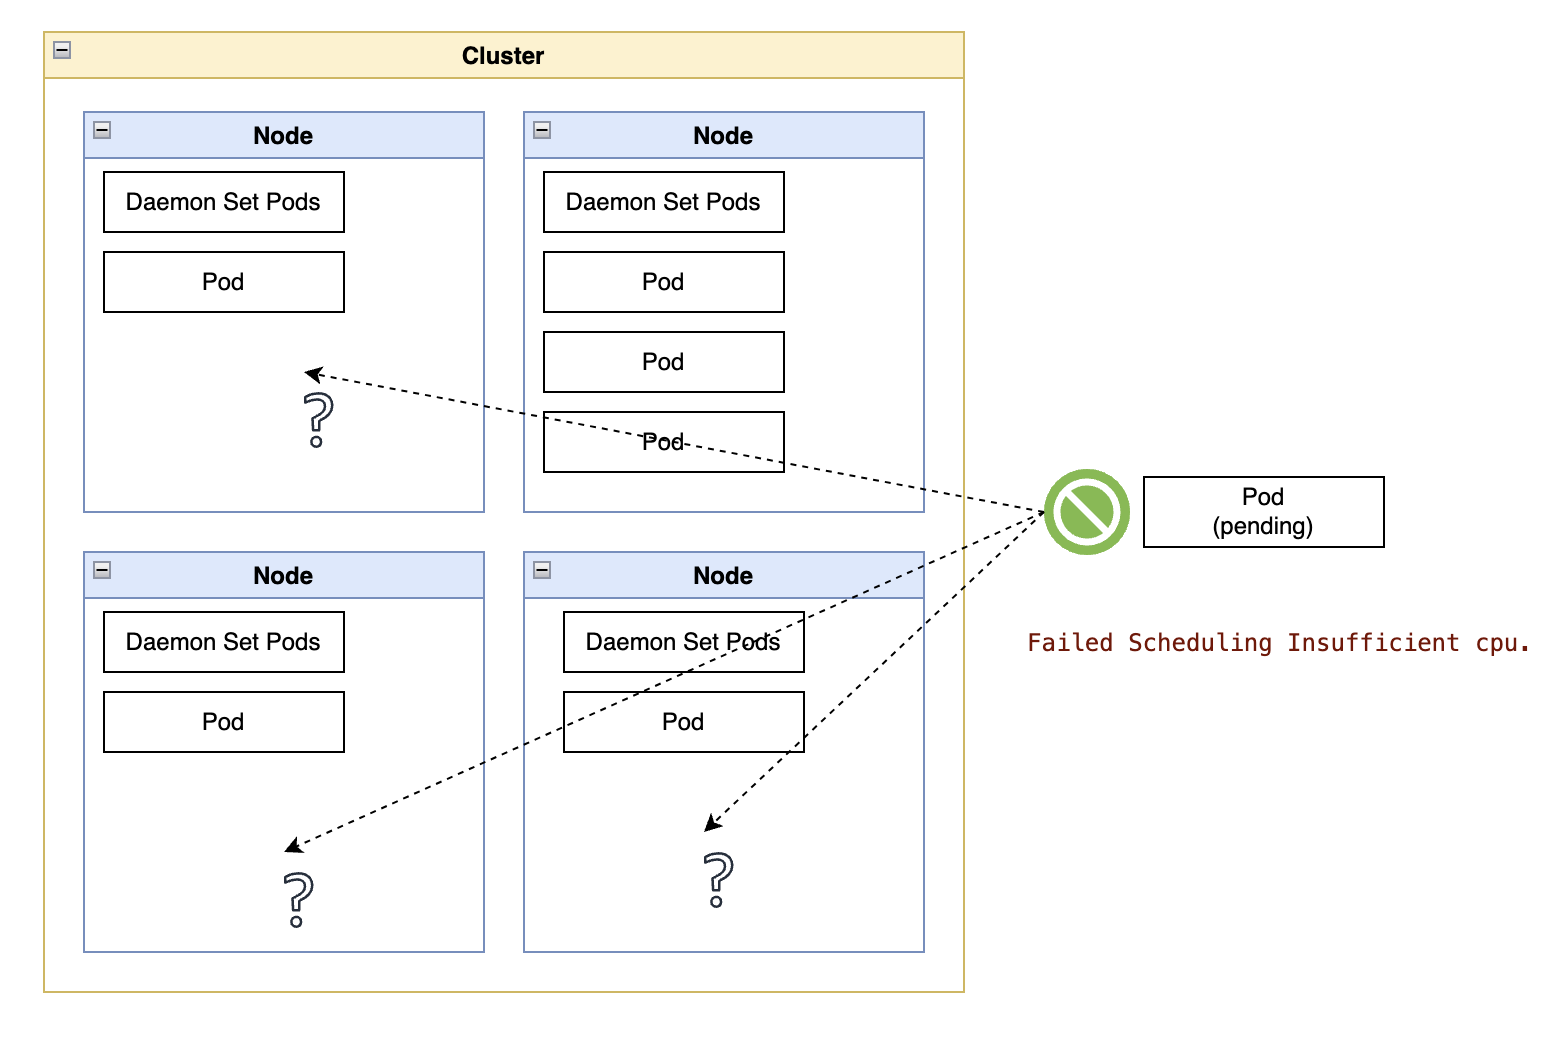
The pod events (retrieved with “kubectl describe pod”) indicated that the pod scheduler was waiting for available CPUs.
That conclusion came from the following message:
Warning Failed Scheduling 65m default-scheduler 0/105 nodes are available: 1 Insufficient cpu. preemption: 0/105 nodes are available: 1 No preemption victims found for incoming pod, 104 Preemption is not helpful for scheduling.
The initial confusion was because it was obvious the cluster had enough CPUs, with an overall workload reservation of CPUs around 70% and a few nodes that had just been created. It became clear that adding more nodes would not solve the problem.

Solving the Mystery
The cluster had the 105 nodes mentioned in the message, so a hurried read of the bits about 0/105 nodes are available and Insufficient cpu is what baffled the cluster owner in the first place.
However, that last portion of the message, 104 Preemption is not helpful for scheduling, was the key to understanding the actual cause.
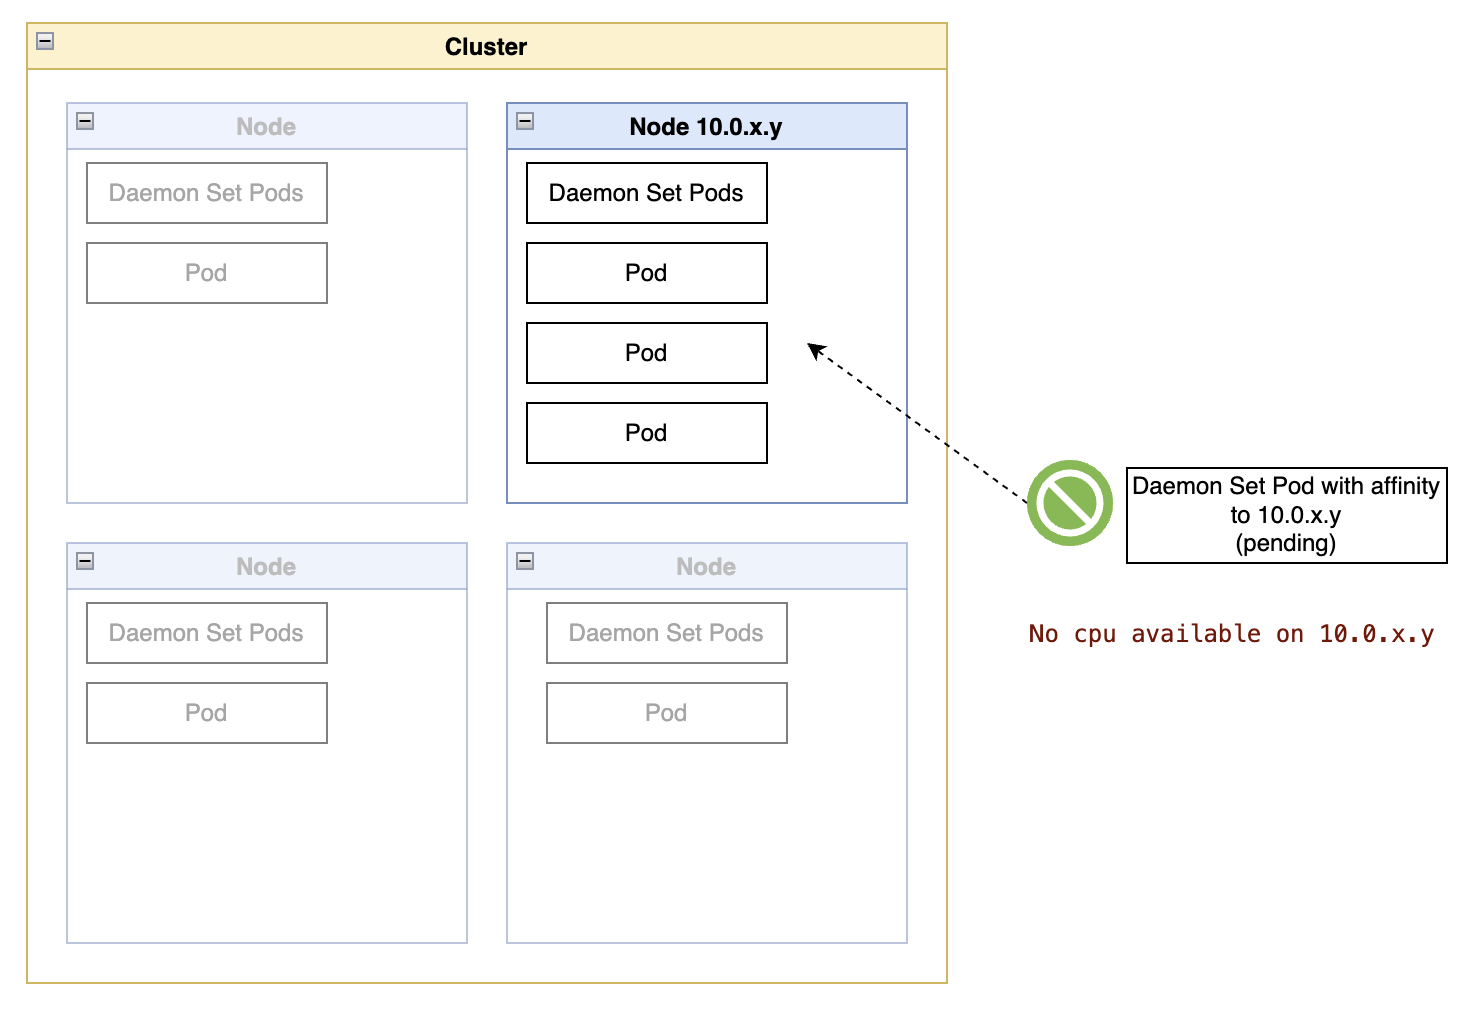
While not as clearly written, the message indicates that preemption (eviction of other pods) on 104 of those 105 nodes would not help. In other words, the lack of capacity was on a specific node, not across all nodes in the cluster.
An examination of the pod affinity rules showed that the pod was indeed matched to a specific node:
spec:
  affinity:
    nodeAffinity:
      requiredDuringSchedulingIgnoredDuringExecution:
        nodeSelectorTerms:
          - matchFields:
              - key: metadata.name
                operator: In
                values:
                  - ip-10-0-x-y.ec2.internal
With such a narrow selection of a specific node, that confirmed my initial suspicion that this pod was owned by a daemonset:
metadata:
  ownerReferences:
    - apiVersion: apps/v1
      kind: DaemonSet
      name: ...

Safely Scheduling the Pod
The quickest solution to this type of problem is not the safest: delete a few random pods on the node to free up enough capacity in the node and then count on the Kubernetes scheduling algorithm to schedule daemonset pods before regular workloads.
There are at least two problems with this “solution”:
-
Deleting a random pod bypasses the availability rules of a parent
Deploymentor eventual pod disruption budgets, causing potential outages for client applications. -
If the random pod is owned by another daemonset, that pod must be rescheduled to the same node, which will still not have the capacity to accommodate both daemonset pods (the initial one and the newly deleted one.)
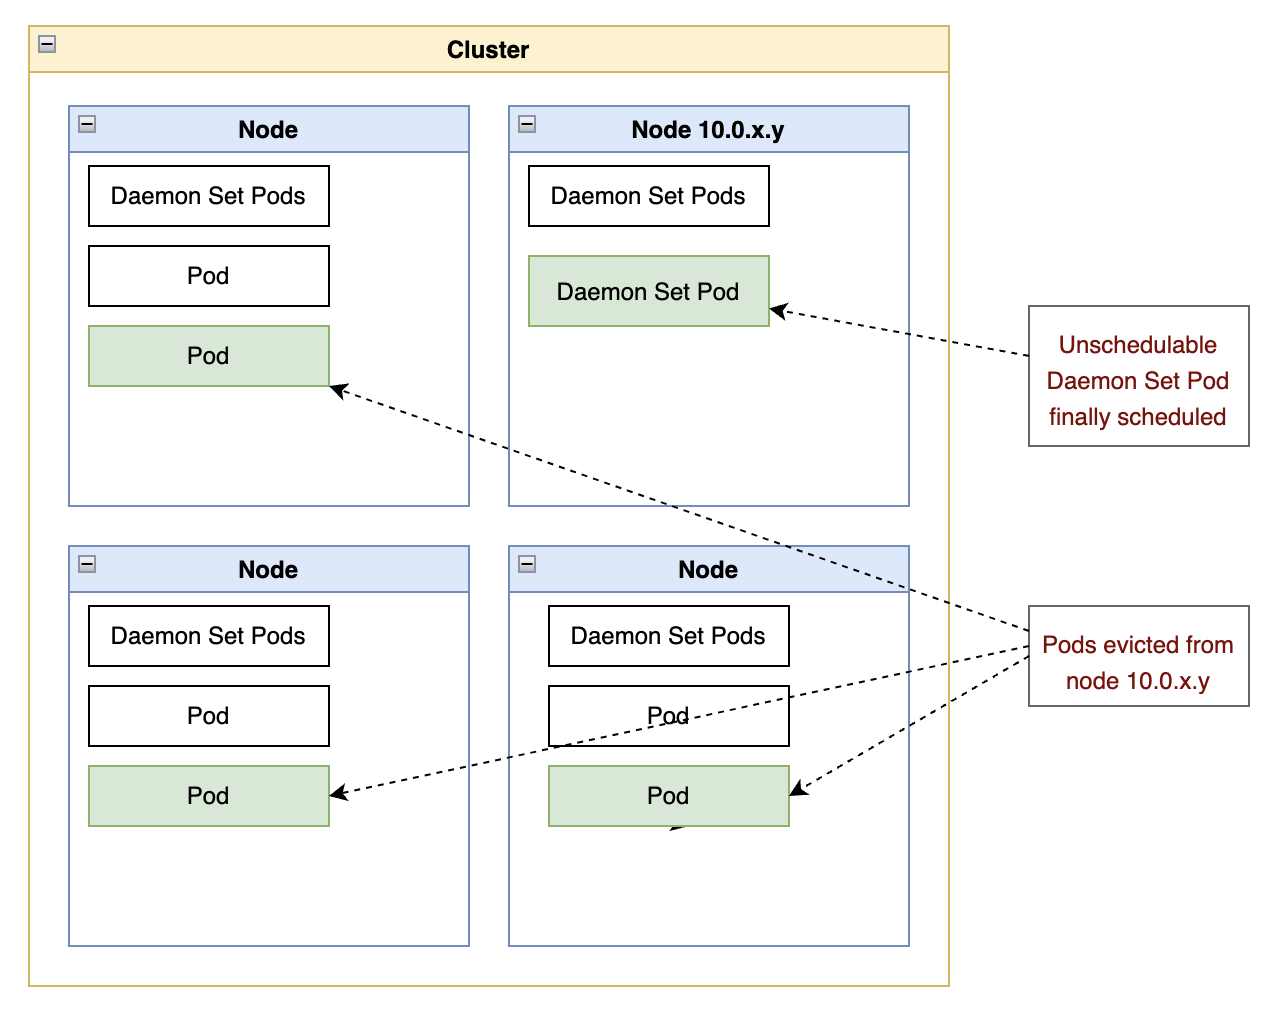
The best balance of speed and safety is to execute a limited drain operation on the node.
A node drain will evict pods that do not originate from a daemonset, allowing the pod scheduler to find a slot for the original pending pod on the node. And the pod eviction algorithm respects the minimum availability rules that a deletion would ignore.
Important: The drain operation cordons the node to prevent new workloads from being scheduled to that node, so it is important to remember to uncordon the node in the end.
To start cautiously, one should use the --dry-run=client parameter to simulate the operation:
Note we do not want to evict the other daemonset pods in the node, so we should always use the --ignore-daemonset flag in this scenario:
kubectl drain ip-10-0-x-y.ec2.internal
    --ignore-daemonsets
    --dry-run=client
This command lists all the pods that will be evicted from the node or shows why pods cannot be evicted. In the latter case, the command also shows which drain options are required to allow the eviction.
One such example of output is shown below:
node/ip-10-0-x-y.ec2.internal already cordoned (dry run)
...
There are pending nodes to be drained:
 ip-10-0-x-y.ec2.internal
...
cannot delete Pods with local storage (use --delete-emptydir-data to override): ...list of pods...
Then, adding the suggested parameter should show an output like this:
kubectl drain ip-10-0-x-y.ec2.internal \
    --ignore-daemonsets \
    --delete-emptydir-data \
    --dry-run=client

# output
node/ip-10-0-x-y.ec2.internal already cordoned (dry run)
Warning: ignoring DaemonSet-managed Pods: ..., ..., ...
evicting pod namespaceX/pod... (dry run)
evicting pod namespaceY/pod... (dry run)
evicting pod namespaceZ/pod... (dry run)

node/ip-10-0-x-y.ec2.internal drained (dry run)
If you are satisfied with the output and comfortable with what will happen during the node drain operation, you can proceed by removing the --dry-run option.
You should also add a --timeout parameter to ensure the command returns promptly and that the drain operation is not blocked due to rescheduling conflicts for some pods.
Those eventual rescheduling conflicts are not a problem in this scenario because the goal is to evict only enough pods to free up capacity for the pending daemonset pod.
kubectl drain ip-10-0-x-y.ec2.internal \
    --ignore-daemonsets \
    --delete-emptydir-data \
    --timeout=60s

# Don't forget to uncordon the node so that customer workloads
# can be scheduled on the node again

kubectl uncordon ip-10-0-x-y.ec2.internal
Once these commands are complete, the pod should have been scheduled to start on the node, and the node should be available to schedule customer workloads.

When a Limited Drain Is Not Enough
When a cluster is loaded close to capacity, a node drain operation may not find enough pods to evict without disrupting the availability of the workloads across the cluster.
In that situation, we can use additional flags in the drain operation to bypass some of the safety nets for node availability, namely:
-
--disable-eviction. This flag tells the drain operation to use “delete” commands instead of using the (safer) eviction protocol. This option bypasses the checks for PodDisruptionBudgets. -
--force. Ignores lifecycle controls for the pod, such as a controller. -
--grace-period. Overrides the grace period in the pod itself.
With all these options combined, this could be the final version of the command for the stubborn cases where a node needs to be forcefully drained:
kubectl drain ip-10-0-x-y.ec2.internal \
    --ignore-daemonsets \
    --delete-emptydir-data \
    --disable-eviction \
    --force \
    --grace-period=60 \
    --timeout=600s

# Don't forget to uncordon the node so that customer workloads
# can be scheduled on the node again

kubectl uncordon ip-10-0-x-y.ec2.internal
If you want to learn more about evictions and scheduling priorities, refer to the section “Limitations of Preemption” in the Kubernetes documentation.


