The Art and Science of Probing a Kubernetes
Look ready, and stay alive
(I originally published this story in my technical blog*)
Keeping containers alive in a Kubernetes cluster can feel more like art than science.
In this article, I dive into the sea of madness awaiting those responsible for authoring container probes, with particular attention to the relatively new addition of startup probes to the mix. Along the way, I leave a breadcrumb trail of curated links you can use to take the next step in implementing the various suggestions in the article.
Starting, nay, requesting the start of a new container in a Kubernetes cluster is relatively simple: provide a pod specification to the cluster, possibly as a pod template wrapped inside one of the various flavors of workload resources, such as a Deployment or a Job. After receiving the pod specification, the kube-scheduler assigns the pod to a node, then the kubelet in that node starts the containers in the pod.
Pods follow a clear lifecycle, and part of that lifecycle allows the kubelet to probe the pod containers to ensure they are responsive throughout their existence. The probes follow a contract where pod containers advertise endpoints from which the kubelet can poll different facets of their internal status.
As a short recap, there are three types of probes to represent the internal status of a container:
- Readiness probes: This probe tells the kubelet when the container is ready to process requests. It is the most prevalent of container probes.
- Liveness probes: This is the “break in case of emergency” probe. A kubelet terminates containers that do not respond successfully in a specified interval. Ideally, containers should exit after realizing they can no longer do their job, but bugs are rarely graceful in their symptoms.
- Startup probes: We could also call them the “I just got here, leave me alone” probes. It tells the kubelet when to start evaluating readiness and liveness probes.
 |
|---|
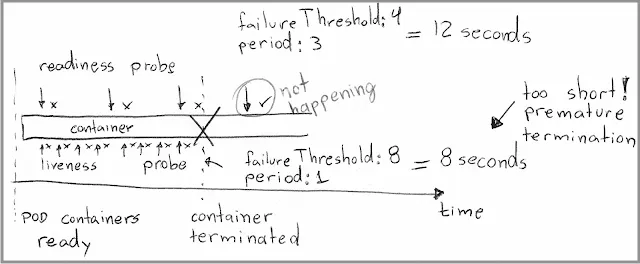
| Figure 1 — Relationship between container probes and a pod lifecycle |
Readiness probes
If a container fails to respond to its readiness probe, the kubelet removes the container from the service load balancer, effectively diverting traffic away from the container. Here, the developer hopes that a replica elsewhere can handle that traffic.
The design of a readiness probe is somewhat straightforward. You want to take into account the state of dependencies and the resource usage in the container:
- Dependencies. Suppose your container depends on a database server or another remote server. In that case, those dependencies tend to offer an endpoint or command-line interface to assess their readiness. If the dependencies are in the critical path of serving requests to clients, then factor in the dependency status in the calculation of the readiness status of the probe.
- Maximum allowed connections. Many frameworks have a maximum limit for accepting new connections, so factor in those limits and report readiness failure when exceeding those boundaries.
- System resources. This one is not as obvious, but running close to memory ceilings and out of space in a filesystem are known for destabilizing processes. You want the cluster to stop sending traffic to the pod before running out of system resources, so consider failing probe calls when these limits reach a certain threshold of the maximum. One of my least favorite forms of resource exhaustion is running out of file handles, which is harder to detect than a simple lack of disk space and can block even the most basic troubleshooting tasks.
Do’s:
- Have a probe. Always define a readiness probe for your runtime containers. You may feel like your container clients can deal with the container becoming unresponsive. Still, there is never a good reason to let the cluster route requests to a container that may not be ready to handle the requests.
- Have the status ready. Consider assessing the status of remote dependencies and resource utilization outside the thread servicing the readiness probe. Readiness probes have a timeout value, and it is best to return a clear failure code immediately than risk timing out a response while gathering input from all dependencies.
Don’ts:
- Do not exceed the tolerance of the liveness probe. If the container also has a liveness probe, do not make the maximum time tolerance (
failureThreshold*periodSeconds) longer than the maximum tolerance for the liveness probe. That is a recipe for letting the cluster route requests to a potentially hopeless container about to crash. - Do not mix slowness with readiness. A slow response is still a response. You may feel your container must let callers know it is not ready because a dependency is taking much longer than usual to process requests. Still, monitoring service performance is an application-level concern better addressed in the observability discipline.
Liveness probes
If a container fails to respond to this probe consecutively, the kubelet will terminate the container. Emphasis on “terminate” versus “restart,” which depends on the restart policy of the pod.
These probes are notoriously difficult to code correctly because the goal of the probe’s developer is to anticipate the unexpected, such as a bug in a process that could put the whole container in an unrecoverable state.
If the probe is too lenient, the container may become unresponsive without being terminated, effectively reducing the number of replicas of that pod with a chance of serving traffic.
If the probe is too strict, the container may keep getting terminated unnecessarily, a condition that is insidiously hard to detect when happening intermittently, risking the pod looking healthy right when you are looking for problems.
Do’s:
- Define a liveness probe. Not having a liveness probe means leaving your container exposed to becoming permanently unresponsive due to a bug, so always give it a try, even if you don’t feel entirely sure you have foolproof liveness criteria.
- Monitor resources. Cover resources like filesystem space, file handles, and memory. These resources are notorious for locking up containers when exhausted. It is wiser to return a failure when memory utilization passes the 90% mark than risk becoming completely unresponsive after hitting 100%. The probe has timeout values, but it is always best to return a clear failure code than let the kubelet infer a crash from a timeout.
- Use commands. Favor invoking commands instead of tcp or http requests. This advice may be controversial, but invoking a shell command uses a lower-level interface, which in turn, has a higher chance of allowing your code to assess the internal state of the container. I have met my share of web servers that are happy to respond to simple ping requests even while half-crashed due to lack of memory.
- Micro control-planes. If possible, use a different connection pool than the one used to serve customer traffic, or set a connection aside specifically for the probes. Think of the distinction between control planes and regular workloads in the cluster but on a much smaller scale. Unless your liveness probe has a dedicated connection for answering the liveness probe, there is a chance that the container is busily servicing customer traffic (and appropriately reporting not being ready through its readiness probe.) Terminating the container under those conditions is harmful since the cluster ends up (temporarily) having even fewer containers to service actual requests.
- Have the status ready. Similar to the suggestion in the section about liveness probes, consider assessing the liveness of the container outside the thread servicing the liveness probe. Liveness probes have a timeout value, and it is best to return a clear failure code immediately than risk timing out a response while gathering input from all dependencies.
Don’ts:
- Readiness is not liveness: Do not check for the availability of dependencies. If they are failing, it is the responsibility of the readiness probe, and terminating the pod is very unlikely to help matters.
- Do not reuse the readiness criteria: I often see container probes hitting the same container endpoint but using different thresholds in
failureThresholdandperiodSeconds. The concerns of a liveness probe are distinct from those of a readiness probe. A container may be unable to handle traffic due to external factors, and a liveness probe using the same endpoint as a readiness probe risks compounding the problem by telling the kubelet to terminate the container. - Tolerate more than readiness probe: Whether looking at the
failureThreshold,periodSecondsor considering the availability of system resources in the container, make sure that the tolerances of the liveness probe exceed the patience of the readiness probe. For instance, the maximum time tolerance (initialDelaySeconds+failureThreshold*periodSeconds) shorter than the maximum tolerance for the readiness probe is a recipe for terminating the container prematurely while still servicing remote requests. - Do not try to be conservative: In doubt, err on the side of leniency, and set higher values for
failureThreshold,periodSeconds, andinitialDelaySeconds, giving your container plenty of latitude to report being alive. A good rule of thumb is using a total tolerance twice as long or longer than the tolerance of a readiness probe. Unexpected hung processes are an edge case and rarer than slow responding processes, and a liveness probe should favor the most common cases.
 |
|---|
| Figure 2 — A liveness probe should allow more time to fail completely than the readiness probe. |
Startup probes
Startup probes are a relatively new addition to the stable of container probes, achieving GA status in late 2020 in Kubernetes 1.20. Note: Credit to my colleague, the ever-knowledgeable Nathan Brophy, for pointing out the feature was already available by default, albeit in beta stage, as early as Kubernetes 1.18.
A startup probe creates a “buffer” in the lifecycle of containers that need an excessive amount of time to become ready.
In the past, in the absence of startup probes, developers resorted to a mix of using initialization containers and setting long initialDelaySeconds values for readiness and liveness probes, each with its own set of compromises:
- It can wait but shouldn’t. Initialization containers allow developers to isolate specific tools and security privileges from the runtime container but are a heavy-handed way of waiting for external conditions. They run serially until completion, and because they are separate containers, it may be cumbersome to transfer the result of their work to other containers in the pod.
- Slow starts. Long pauses set via the
initialDelaySecondsfield on a readiness probe can waste time during a container’s startup because the kubelet always waits that much time before considering sending traffic to the pod.
Consider whether your existing liveness and readiness probes take relatively long to start and replace high values of initialDelaySeconds with an equivalent startup probe.
For instance, this container spec below:
spec:
  containers:
    - name: myslowstarter
      image: ...
      ...
      readinessProbe:
        tcpSocket:
          port: 8080
        __initialDelaySeconds: 600__
        periodSeconds: 10
      livenessProbe:
        tcpSocket:
          port: 8080
        __initialDelaySeconds: 600__
        periodSeconds: 20
can be significantly improved by moving that delay to be observed in a startup probe, like in the next example:
spec:
  containers:
    - name: myslowstarter
      image: ...
      ...
      readinessProbe:
        tcpSocket:
          port: 8080
          # i̵n̵i̵t̵i̵a̵l̵D̵e̵l̵a̵y̵S̵e̵c̵o̵n̵d̵s̵:̵ ̵6̵0̵0̵
        periodSeconds: 10
      livenessProbe:
        tcpSocket:
          port: 8080
          # i̵n̵i̵t̵i̵a̵l̵D̵e̵l̵a̵y̵S̵e̵c̵o̵n̵d̵s̵:̵ ̵6̵0̵0̵
        periodSeconds: 20

      # add this
      startupProbe:
        tcpSocket:
          port: 8080
        failureThreshold: 60
        periodSeconds: 10
In the first example, the kubelet waits 600 seconds before evaluating the readiness and liveness probes. In contrast, in the second example, the kubelet checks up to 60 times in 10-second intervals, thus enabling the container to start as soon as it meets its startup conditions.
A hidden benefit of the frequent checks in a startup probe is that it enables a developer to set high values for failureThreshold and periodSeconds without worrying about slowing down the container startup. In contrast, the unwieldy observance of initialDelaySeconds puts pressure on developers to ignore edge cases and set lower values that allow the entire application to start faster. In my experience, “edge cases” are synonymous with “things we have not seen during development,” which translates to unstable containers in some production environments.
As a rule of thumb, use startup probes if the initialDelaySeconds field in your readiness and liveness probes exceeds the total time specified through failureThreshold * periodSeconds fields. As a companion rule of thumb, anything over 60 seconds for initialDelaySeconds in a readiness or liveness probe is a good sign that your application would benefit from using a startup probe instead.
Timing is everything
After observing the suggestions in this article, you are ready to ask the inevitable question:
“So, what should I use for the probe settings?”
In general, you want the readiness probe to be sensitive and start reporting failures as soon as the container starts struggling with responding to requests. On the other hand, you want the liveness probe to be a little lax and only report failures once the code loses a grip on what you consider a valid internal state.
For timeoutSeconds, I would recommend keeping the value at its default (one second.) This suggestion builds atop my other advice for assessing the responses of a probe outside the thread answering the kubelet request. Using a higher value widens the window where a cluster can route traffic to a container that cannot handle the request.
For the combination of periodSeconds and failureThreshold, more checks in the same interval tend to be more accurate than fewer checks. Assuming you followed the suggestion of assessing the container status separately from the thread responding to the request, more frequent checks will not add significant overhead to the container.
Mind your CPU limits
Different clusters, different speeds.
A common problem with probes, especially liveness probes, is assuming a cluster will always give your container as much CPU as you request. The other common mistake is assuming clusters will always observe fractional requests with surgical precision.
Starting with the hypervisor and the VMs hosting worker nodes, all the way to the CPU limits in a pod specification, there are myriad reasons why a container can run the same stretch of code at different speeds.
Here are the top factors that can blind-side a developer:
- Overcommitted CPUs in the hypervisor: Shared VMs in the IaaS provider. Even identical hardware and networking speeds can be affected by the occasional “noisy neighbor” hitting a burst of CPU usage. Modern hypervisors are pretty good at compensating for such bursts and even throttling processes. Still, an IaaS may overcommit CPUs assuming processes do not burst simultaneously.
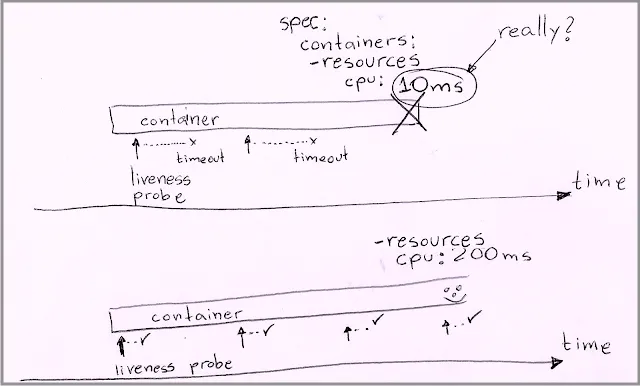
- Infinitesimal CPU requests: Setting a CPU limit of 20ms for CPU allocation to a container may seem like a responsible, conscious decision for a container that rarely does any processing. However, in the real world, a worker node does not have a tiny vCPU 2% the size of a full vCPU. The worker node attempts to simulate that tiny vCPU by giving your container an entire vCPU during a short time, resulting in a “lumpy” allocation of CPU to the container. As a result, the container may receive more CPU than requested for a brief interval and then entirely pause for longer than expected.
Learning a bit about the hardware characteristics and overcommitment settings of your IaaS provider can go a long way in deciding the safety multipliers to add to settings like timeoutSeconds, failureThreshold, and periodSeconds. Keep those two factors in mind when setting the values for probes, especially liveness probes. Depending on what you learn, you may also reconsider the settings for CPU requests and limits so that your probes have enough processing capacity to respond to requests promptly.
 |
|---|
| Figure 3 — Healthy container getting terminated due to a restrictive CPU limit. |
Conclusion
This article offers a range of suggestions to improve the precision and performance of container probes, allowing containers to start faster and stay running longer.
The next step comes from careful analysis of what runs inside the containers and studying their behavior in actual runtime across a diverse set of clusters and conditions, going as far as simulating failures of dependencies and reduced availability of system resources. Using the kubectl utility and its ability to format and filter contents is a great way to find containers with a high number of restarts and inadequate probe limits, which is a more technical subject covered here. Using PromQL with Kubernetes metrics can further expand that technique with charts for various time series, a topic covered in this other article.
In summary, keep the goal of the probes in mind when writing them, and ensure they run quickly and assuredly, providing clear information with minimal (if any) false positives in their response to the kubelet. Then trust the cluster to do what it does best with the data, ensuring maximum availability of your containers to their clients.


